Sunday, May 9, 2010

One Pot Chicken

Recently I ate at Mama Woks, but what's more interesting to me (and probably to all of you) was their "three piece chicken" that was served in one big pot of smoking, yummy, goodness. How I came to order this dish was epic in it's own right; when we sat down, we noticed that an elderly woman was chewing away by herself, with a table filled with classically Chinese influenced dishes. One of them happened to be the "three piece chicken". Okay, maybe not that epic, but amazing none the less, I mean, this old woman was the prime example of a foodie all and all. I was inspired and determined that I will order what she's having. I was not disappointed. When the dish came out, it was contained inside of a clay pot and covered; the anticipation creeps at me as I lifted the top (slowly for dramatic effect) and was overwhelmed by the simplicity of the presentation, while seduced instantly by its subtle aroma.

The "three piece chicken" reminds me of what good Chinese food was like; all elements that makes up Asian cooking are clearly presented with sweet, sour, salty, and subtle spices worked well to harmonized this dish. I have no idea however why it was called "three piece chicken", as the pieces are cut up into bite sizes. Maybe it's a loosely "English" name for something far more fierce and meaningful, like "Dragon of wisdom seas" or maybe they just simply cut small pieces of chicken out of three larger pieces. As I'm typing this, I'm beginning to lean towards the later.

So, this brings us to my "one pot chicken". Basically, I'm taking all the flavor profile that I found the "three piece chicken", deconstruct it, and cook it all in one big pot to save time. This is perhaps the easiest dish that I've made in a while. If you like good foods, and don't have a lot of time to make it, read on.

Ingredients:
  • chicken breast (cut into bite size)
  • onion (cut into quarters)
  • ginger (chopped finely)
  • garlic (diced)
  • soy sauce
  • black peppers 
  • green onion
  • corn starch
  • chicken broth (or water, but use stock when you can)
  • lime
  • basil (chopped finely)
  • celantro (chopped finely)
Methods:
  •  Put everything into one large pot and put heat on medium to medium high; cook for about 20-30 mins. Make sure to stir occassionally, and add corn starch at towards the end to thicken the sauce. Add more soy sauce, sugar, and lime to taste, otherwise you're good to go. Serve with rice of course.

Tuesday, March 30, 2010

Pork and Rice and everything nice ...

I really haven’t had a lot of time to write lately, so it makes complete sense that some of my friends (Summer) think that I have not been eating. I can assure you that I’m not wasting away and still cook every week. Work has been keeping me pretty busy, and not to mention the fact that I’m easily distracted by various hobbies and novelty ideas. There’s just not enough time in one day to accommodate my “ADD-ness”.

The fact the matter is, I’ve been eating, and eating well at that. Recently, I wanted to really cook some of the things that I really wanted to cook; using flavor profiles that I know has been proven to work to go about the business of making great foods. Don’t get me wrong, I still love to enjoy different types of ethnic foods, and will continue to explore all kinds of goodies, but sometimes, you just have to eat what you know is good.

Take “pork and rice” for example, very simple, very straightforward, and always comforting to have. The idea of this dish came from the fact that I simply didn’t have a lot of time to do the research required to make an authentic international dish. I’m sure most of you can relate to the hectic work schedule and having to wonder, “what’s for dinner?” For me, I like to think about “what’s for dinner” early in the morning so that I will have ample time to defrost proteins, to marinate something, or simply to know what I need to buy at the store in order to cook when I get home. If there’s one thing I hate most above all things is being hungry and not having a plan to resolve my hunger, bad things usually happens when it comes to that (I’m exaggerating here, I just get really bad headaches when I’m hungry).

So, to make “pork and rice”, here are some of the things that you’ll need in order to be organized ahead of time and cook well:
  • Pork (tenderloin works best)
  • Rice
  • Brown sugar
  • Garlic powder
  • Rosemary
  • Salt
  • Peppers
  • Sriracha sauce
  • Capers (diced)
  • Lime or lemon (anything sour really)
  • Broccoli
Most of the ingredients above is to make sure that your marinate is well balanced; as for the broccoli and rice, you’ll want just steam the broccoli and cook the rice. I told you that this was simple. When it comes to marinating the meat, just rub the rest of the ingredients onto the pork, with the emphasis on salt, brown sugar, and Sriracha sauce. The idea is to make the pork well seasoned and savory. Be careful when using capers they’re really salty. Add 1 lime to the whole mix to balance everything out and also to make sure that marinate have some liquid to it; this will help keep the pork from being dry. You’ll want to marinate your pork for about 4-5 hours and cook it in the oven (on broil) for 20 mins on each side. Make sure to keep a close watch on the cooking progress since they meat could be easily burned due to the brown sugar. Another helpful tip is to let the pork “rest” for about 5 mins after you pull it from the oven; doing so will help locks in all the moisture.

To serve:

I found it to be delicious when I spooned some of the au jus (liquid or sauce that came from cooking the meat) onto the rice, then placed slices of pork on top. Best served with a side of broccoli or sauté green beans. Enjoy!

Monday, March 29, 2010

Banh Mi (Vietnamese Hoagie)

 
What does one think of when they think about "fast food"? How about "street food"? Often times, we will think about hot dogs and burgers, which are good in their own rights, but for me, I think about Banh Mi, or Vietnamese hoagies. Banh Mi can be directly translated in English as "bread", how we got to skip the translations about all the good stuff that's inside the bread is beyond me, I guess we just got lazy.

Recently, I've decided to make "banh mi" after ordering it a couple of times a week from the local bakery. Their banh mi was good, but I felt like I could make it better suited for my taste, using the ingredients that I like, and I can have as much as I like as well. My version of Vietnamese style banh mi is a classic Vietnamese pork BBQ, with pickle diakon radish and carrots. 

Here are a list of things that you'll need:
  • Bread (Vietnamese/French style baguette works best
  • Cucumbers 
  • Celantro
  • Chili Peppers
  • Green onion
  • Diakon radish (cut into small strips)
  • Carrots (cut into small strips)
  • Pork
  • Lemon grass (finely diced)
  • Sugar
  • Salt
  • Soy sauce
  • Black peppers
  • Lime
 Don't let the long list of ingredients scare you, a lot if it has to do with prep work and not so much with actually cooking them. In fact, the only thing that you would have to pay great care to is the pork since you'll have to marinate it and make sure it's seasoned well.

Marinating and cooking the pork:

Add finely diced lemon grass, lime, soy sauce, sugar, salt, black pepper into a bowl and mix it up until everything is dissolved; make sure you taste it before adding the mixture to the pork. I usually just marinate the pork overnight, but 3-4 hours would also do the trick. Cook the marinated pork in the oven at 375 degree for about 40 mins (depends on how big the pork is).

Making the pickled vegetable:

This is pretty simple to make. In a large bowl, add sugar, salt, rice wine vinegar, and warm water; you'll want to mix everything together until all the sugar dissolved. The taste of your pickle mix should be 40% sweet and 60% sour. Add diakon radish and carrot and mix well.

Putting it all together: 

From here, just slice the pork and add all the veggies together to make a hoagie sandwich. You can add soy sauce and hot chili peppers if you like. Enjoy!

Tuesday, February 9, 2010

Pork Tenderloin with Couscous and Green Beans!!

 
One of the hardest things about working out and maintaining a  healthy diet is maintaining a healthy diet. First of all, I hate the word "diet", it feels so restricted and limiting. However, now that I'm committed to doing the P90X workout program, I have to be more mindful about foods. While watching a documentary (Food Inc) yesterday about the food culture in the U.S., it solidify the idea that healthy-alternative foods are way more expensive and inaccessible to the public as unhealthy fast foods or process foods. This is another reason why I like to cook so much; I love the idea of controlling the ingredients and making sure that my food is being handle properly. That and the fact that I'm a control freak with OCD tendencies. At the same time, I realized that cooking alone is not enough to be healthy, it's what you cook that makes all the difference.
Now, you may think, "but you said that healthy food is expensive!", it can be, but it doesn't have to be, if you know the right things to cook. Take pork tenderloin for example, very lean-high protein meat; when cooked properly could rival the best cut of steaks (and I love me some steaks). Usually, I'm not a big fan of pork, I prefer my beef over the "other white meat" any day, but you know, I'm beginning to change my mind. 
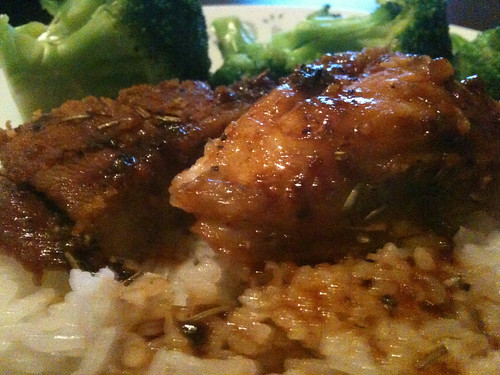
Last night, I made roasted pork tenderloin with a red wine and raspberry reduction, served with couscous and green beans sautéed with garlic and butter (the healthy smart balance kind). The result? Simple and delicious!
Please keep in mind that there are multiple cooking processes (4 in all) to this dish, but they're all pretty simple and straight forward. 
Stuff you'll need:  
  • Pork tenderloin (enough for 4 servings)
  • Curry powder
  • Garlic powder
  • Five-spice powder or ngu vi huong (in Vietnamese), you can get it at any Asian grocery stores very cheaply
  • Lime
  • Salt and pepper
  • Sugar
  • Cumin 
  • Red pepper flakes
  • Red wine
  • Raspberry (get it fresh if you can, if not, get it in a jaw)
  • Unsalted butter
  • Sriracha sauce for some heat
  • Onion
  • Garlic
  • Green beans
  • Chicken stock
  • Couscous
  • Red bell peppers (optional)
  • Green onions (optional) 
  • Olive oil 
The meat:

This is the star of the show, so we'll spend the most amount of time here, prepping and cooking wise. First, you have to marinate the meat evenly with a dry rub consist of garlic powder, black pepper, salt, cumin, red pepper flakes, cumin, curry powder, and the five-spice powder. Don't be afraid to use your hands and really get to know the meat, making sure that the spices cover every inch of it. You should marinate this for about 8-12 hours; I just prepped it before bed and cook it the next day after work. Once you're ready to cook this, place it in the oven with a bit of chicken stock and cook for 1h and 20 mins at 400 degree.

The Sauce: 

This is a simple red wine reduction. First, sauté fresh garlic and onion until they're brown. Add the raspberry and red wine and lower the heat to simmer and reduce. What you're looking for is for the sauce to burn away most of the alcohol in the wine, leaving you with just a hint of alcohol and a ton of fruit flavors. Season with salt, pepper, lime, and lime zest.

The Couscous? 

I just like saying "couscous". This is the first time that I cooked couscous, and the process couldn't be easier. Again, start with your garlic and onion with a little bit of olive oil, and sauté them with chopped red bell peppers and green onions for about 1 min or 2. Add chicken stock to your pot and wait until it comes to a boil. Add the couscous and stir until it absorbs all the stock, this might take about 2-3 mins, add more stock if you find it a bit dry. What you're looking for here is a balance between moist and dry. Add butter to make it a bit creamier if you like; I did not (P90X!! The X stand for X on the excessive butter).

The beans

This is one of my favorite things to eat, and it's so simple and quick to make. Basically, you just want to sauté the green beans with garlic, olive oil, and butter for about 2-3 mins, and you're good to go. The trick here is to use a lot of garlic so that you really taste it in every bite.

To serve: 

Place the couscous at the bottom of the plate, then place a couple slices of pork tenderloin on top, drizzle some of the red wine sauce on it. Put the green beans on the side, and you're ready to enjoy your hard work.

This dish may seem like a lot of work, but once you do it, you'll realize that you everything cooks relatively quickly. The only thing that takes a while to cook is the pork, but that can't be help, nobody wants to eat raw pork :).

Friday, February 5, 2010

Chicken Mole and Rice


I think it's interesting how almost every country have their own version (or versions) of chicken and rice; perhaps its the fact that something so simple could be so good is the reason why. Whatever the reasons, I know that when it comes to this delicious combinations, it makes me happy. While searching online for a great Latin recipe, I stumble across this "Chicken Mole and Rice" dish that I must try out. For starter, I've never made mole before, so I was pretty excited about process itself. I was elated to know that I have 90% of the recipes in my pantry; talk about an easy dish that will save you some dough at the same time.

So, what the hell is "mole"? According to the very trusting Wikipedia, mole is a general name for many types of thick-rich Mexican sauces that is distinctively different than salsa. These sauces typically served with chicken and other types of meat. If you're interested in reading more about mole, you can check it out here.

For this version of mole, I'm incorporating some heat elements, but you don't have to make it spicy if you don't want to.

Stuff you'll need: 
  • Chipotle peppers with adobo sauce (this is becoming one of my favorite thing to cook with, so much favor and also good amount of heat as well)
  • Chicken thighs, de-boned and cut into cubes
  • Garlic, onion, salt, pepper, and chilli peppers
  • Semi-sweet chocolate 
  • Lettuce
  • Rice
  • Diced tomatoes with tomato sauce (I just get this in a can since it's 2 birds with one stone)
  • Lime
  • Olive oil 
  • Chicken stock 
Cooking directions:  
  1.  With a pan over medium-high heat, add olive oil, then wait about 2 mins before you add the garlic and onions. Cook for about 3 mins or until they're nice and soft.
  2. Add the chicken and cook until all sides turns white.
  3. Add diced tomatoes and a little bit of tomato sauce and stir for about a min.
  4. Add chicken broth, along with diced chipotle peppers and adobo sauce.
  5. Add the semi-sweet chocolate and stir until it's dissolved completely.
  6. Turn the heat down to a simmer and reduce the sauce until its thicken. 
  7. Flavor with salt and peppers to taste. 
  8. Lastly, squeeze half a lime into the sauce and use the zester to add some lime zest to balance everything out.
To Serve:

 With a plate of white rice, add the chicken mole on top, and place some crunchy lettuce for a contrast in texture.

This is an extremely easy and quick dish to prepare; cost wise, it will be around $12-$15 for a serving of 4. The next time however, I will experiment with other veggies in the sauce itself for added flavors. Thanks Christina for the recommendation!

Mole on Foodista

Thursday, February 4, 2010

Good Foods vs. Good Health and .... Fish Tacos!

Recently I've been taking my fitness more seriously and really want to evaluate how I'm working out and what I'm putting into my body. For the most part, I'm pretty healthy when it comes to food. I like to use fresh ingredients whenever possible, and  try my best to stay away from fried foods when I see them (sometimes not very successful; I like my fried foods from time to time). I'm also no saints either when it comes to eating what I want to eat. Foods like BBQ, the burgers from Carytown Burgers and Fries, fried fish, and pizzas with beers are always a weekend favorite, especially during football season.

More often than not, I find it hard to be on a healthy diet when it comes to experimenting with different types of foods. I mean, how can you cook something truly authentic, but leave out some "unhealthy" components just for the sake of being "healthy"? I think there should be a balance in there somewhere, but until I truly find it, I'll continue to workout like a madman in order to enjoy the things that I love.

With that being said, cooking and making conscious decisions about what to cook can help eliminate a lot of the good foods vs. good health problem. For instance this week, I'm venturing into Latin cuisines, with the emphasis on cooking healthy, well-balanced meals, while staying on a strict budget. As daunting as this task may seem, I'd managed to find a couple of recipes that will do just that. I will show you a simple fish taco recipe that will be filling as well as great tasting.


Stuff you'll need:  
  • Salmon fillets
  • Corn
  • Tomatoes (chopped into cubes)
  • Lettuce
  • Flour tortillas or hard tacos will work as well
  • Onion (chopped into cubes)
  • Garlic (diced)
  • Salt 
  • Black pepper
  • Chili pepper
  • Chipotle pepper (Diced. I usually get the ones in the Adobo sauce, they're great!)
  • Lime
  • Cumin
  • Grated cheese 
Cooking Directions:
  1. Season the salmon fillets with salt, black peppers, chili peppers, and a little bit of cumin to coat both sides. 
  2. Place fish in the oven and broil for about 6-8 mins, depending on how thick the fillets are. Use less cooking time for thinner slices. 
  3. On a pan over medium-high heat, add olive oil, garlic, and onions and cook until they turn slightly brown.
  4. Add the corn and tomatoes and toss gently until they are slightly soft, about 2-3 mins.
  5. Add salt, black pepper, chipotle pepper, and lime juice to taste. 
To Serve: 

 Put everything together inside the flour tortillas and make a taco; the beauty of making tacos is simply the fact that you can add a lot of condiments into your tacos. I just add some lettuce and a little bit of grated cheese to round out mine. Oh yeah, if you want some more heat, just add some Sriracha sauce on it, you won't regret it... maybe.

 That's all there is to making my version of the fish taco; it's one of those dish that's healthy and delicious so don't be afraid to have more than 1. This dish will cost you around $16 to make, serving 4.

For more fish taco recipes:

Fish Tacos on FoodistaFish Tacos

Tuesday, January 26, 2010

Seafood deliciousness


I'm a big seafood guy. Growing up, seafoods, fish in particular, was a part of my everyday diet. Maybe that's why I try to seek out seafood dishes every chance I get, but seafood is so expensive around this area for some reason. Luckily, I travel to Virginia Beach about twice a month to visit my parents, and the markets there have very reasonable prices for seafood ($4 per/lb shrimp, $2 per/lb fishes). I think it has to do with competition, and being closer to the source that makes the prices so affordable.

When I was searching online for a good Italian seafood recipe, I was not happy with the results. Some requires too many ingredients, while others suggest expensive types of fish; none of them really offers what I wanted to make. The only thing that was left for me to do was to create a dish of my own that hopefully captures the spirit of an Italian meal, while cooking what I want to eat. The result, delicious. You can check out the rest of the photos for this dish and other dishes on my Flickr account.

Ingredients:
  • Fish fillet (I used Rock fish), garlic, onion, salt, black peppers, flour, fresh roma tomatoes, white wine (pretty much any white wine that you would drink; I chose a chardonnay for its fruity aroma which lends itself nicely with fish ), pasta.
Cooking Directions:
  • Start off seasoning the fish with salt and pepper, then coating it with a little bit of flour so that it'll be crispy when you fry it.
  • With medium-high heat, add olive oil and fry the fish until both sides are golden brown.
  • On a separate pan, you'll make your sauce by adding butter, garlic, and onions, and cook them until they're soft.
  • Reduce the heat to medium-low and add the wine. 
  • Add freshly chopped tomatoes to the pan, and stir occasionally. 
  • Season with salt and pepper to taste. 
  • Reduce the sauce until you get a saucy consistency. 
  • Sprinkle dry parsley and oregano into the sauce and you're ready to serve.
To Serve: 

Pour sauce over pasta and fish to enjoy with a nice glass of wine.

When you can find good seafood at a decent price, you should definitely try this dish as it only cost me about $14 to make ($7 of it was for 2 Rock fish, and we're not counting the wine).

Winner Winner, Chicken Dinner (Chicken Marsala)


Italian foods. We’ve all had it before, most of us like it … a lot, and more often than not, we’ve all over-paid for it.

Looking back at all the Italian places that I’ve been to, I can only recalled a couple of places that actually does a decent job of cooking authentic Italian foods. So why are we paying so much for Italian foods? I have no idea.  All I know is that most restaurants tried so hard to make their food sounds better than it actually is; a “touch of” this, a “dash of” that, and you’re well on your way to a disappointing-overpriced meal. To me, the simplest ingredients are usually the best way to go about cooking and eating your food; just give me something fresh and recognizable, with simple names, and simple means of eating it, and I’m good.

Don’t get me wrong, I love Italian foods; I think it’s one of those types of foods where less is more, and simplicities doesn’t mean you’re giving up complexities.  Chicken Marsala is a perfect example of this train of thoughts. You can make it relatively quickly, and it doesn’t cost a lot in terms of ingredients; Chicken Marsala when done right, can be a beautiful thing… and yummy as well.

So let’s get to it! Here are some things that you’ll need:
  • Chicken (most people use chicken breast for this, but I like the chicken thighs. You just have to butterfly it to get it to be flat; easy enough.)
  • All purpose flour
  • Marsala wine
  • Black pepper
  • Salt
  • Mushroom (optional)
  • Garlic
  • Onion
  • Butter
  • Olive oil
 Cooking instructions:

This dish requires a little bit of prep-cooking since you'll have to flatten the chicken breast/thighs a bit in order to get an even coating of flour to it. As mentioned above, I used chicken thighs for this dish since I found it more flavorful. I also added a little bit of salt and pepper before I coated the chicken; it helps bring out the flavor this way.
  • With a pan over medium-high heat, add olive oil and place chopped garlic and onion; cook them until they're soft, but not brown.
  •  Add a teaspoon of butter to the pan, then add the chicken. Sear both sides until they're golden brown. 
  • Remove the chicken and place on the side for now. I don't like to cook mine in the sauce since I like them crispy, it's a personal preference.
  • Add a little bit of butter to the pan and reduce the heat to medium-low.
  • Add the rest of the chopped garlic and onions, along with sliced mushrooms. You should cook this for about 2 mins. 
  • Add marsala wine and a tiny teaspoon of flour to help thicken the sauce.
  • Season with salt and pepper to taste.
To Serve:
  • With a plate of pasta, add a bit of the marsala sauce that you've just made over it.
  • Place your cooked chicken on top, and add more sauce over the chicken. 
  • Garnish with something green (I used cilantro since that's what I like with my chicken). 
This dish is about $12 to make, and you can make enough for two so I hope you guys make it and let me know how it turns out. Enjoy!

Thursday, January 14, 2010

Bip Bim Bap


As my tour of “all things Asian” continues this week, I just had the urged to make “Bip Bim Bap”. With a name like that, it has be to really good or really funny tasting; I’m just glad that it’s not the latter. Many years ago when I worked as an international telephone operator, my Korean co-workers introduced me to Bip Bim Bap for the first time. Although they never told me what Bip Bim Bap meant; they explained to me it was a combination of thinly sliced meat, assorted veggies, red chili peppers, and different kinds of pickled vegetables (Kimchi is a popular choice); mix all together to form an explosion of flavors. ¬You can find the same dish in Korean restaurants where they would often placed a sunny side up egg on top; you would break the yolk and continue with your mixing of all the ingredients.

It’s been years since I had this wonderful dish, so what better time to make it than this week? Staying true to my budget and now …a healthy diet (with great foods come great responsibilities, or something like that), I set out to make my own version of Bip Bim Bap. In this version, I will make Korean style BBQ to go with vegetable sauté. Simple and delicious. Notice that I left out the fried egg and Kimchi; I’m cutting back on those.

Below are a list of stuff that you’ll need, how much of it will depends on how many servings you intend to have:
  • beef
  • green onions
  • cabbage (sliced)
  • garlic (chopped)
  • hoisin sauce (pho sauce for my American friends)
  • chili pepper or sriracha sauce
  • sugar
  • black pepper
  • rice wine vinegar
  • bean sprout
  • soy sauce
  • rice (I won’t go over how to make rice)
  • sesame oil
Although this is technically one dish, there are multiple components, so first thing first.

Directions to make Korean BBQ
  • slice beef into very thin slices (the thinner the better) and set that aside
  • using a large bowl, add hoisin sauce, sugar (the ratio of sugar to hoisin sauce should be 1 ½ to 1), black pepper, sriracha sauce, garlic, a little bit of rice vinegar, green onions, and a bit of sesame oil. You might want to add a little bit of hot water to help dissolve everything as you mix all ingredients until they are uniform in texture. It should taste sweet, spicy, and tangy, with a bit of saltiness.
  • On a very hot grill or flat pan place the sliced beef and cook evenly or until you think it’s done (for me, 2 mins on each side)
  • Add the BBQ sauce that you’ve just made to the meat while it’s still hot so that it could soak up all the flavors
Directions for vegetable sauté
  • with a hot wok, add oil and cook the garlic until golden brown
  • add sliced cabbage and cook for about 4-5 mins (you want to make sure that it’s still crunchy)
  • add the bean sprouts
  • add a little bit of sugar and soy sauce to taste
  • finish off with some black peppers
To serve:

With a large bowl of rice, add the sauté veggies and BBQ to it. Mix everything up and you’re ready to enjoy! This is a very simple dish and there are tons of ways that you can make it your own by incorporating different vegetables and sides. The trick is to experiment and figure out if one dish will complement the next and so on.

Monday, January 11, 2010

Vietnamese Soul Food part II (ca kho to)

I don’t normally have a lot of time to blog what I’m cooking right after I cook it, since I’m either too tire or stuffing my face, so I find it helpful to break up my blogs into different postings and write them on a different day.  I tend to write all my stuff on Word, then copy and paste them onto here; I’m paranoid that way. So if you see a ton of postings on one day, that’s the reason behind that, I’m really not that diligent.

Anyways, this post is neither about this nor that, this is about caramelized fish, and when it’s done right, it’s a beautiful thing. Now, before you picture some yucky fish sticks on a candy-apple-like contraption, rest assure that it’s nothing like that (I think).  I learned this dish from my mother (like all the other Vietnamese dishes that I cooked), but could never make it as well as she did. She got too many years of experience on me. Nevertheless, I will try my best to show you how I went about making caramelized fish.

Conceptually, this is an extremely easy dish to make. All you’ll need is a fish that can stand up to very slow cooking over a long period of time (I suggest catfish because it’s a little tougher than other fishes), sugar, salt, black pepper, and green onions; it’s the “I’ll try my best not to burn the sugar”… that’s the bitch part.

Before you start cooking: 

  • Cut your fish into even slices and place into a decent side bowl for marinating
  • Add the following to the bowl: about 4-5 spoon of sugar (depends on how many fish you have, I’m using 1 large catfish), 1-2 spoon of salt, black pepper, diced garlic, chopped green onions, and a little bit of water to dissolve everything. You’ll want to marinate this for about 2 hours.

Cooking Directions:

  • On a medium to large pan, add a little bit of water (no oil is needed please, it doesn’t go well with water) over medium-low heat.
  • Add all the components from the marinated fish bowl to the pan and wait for the sauce to reduce while cooking your fish. 
  • On a separate pot, make a simple sirup (3-1 ratio of sugar to water) by mixing sugar and water together over heat until it becomes a “syrup”. The trick here is that you want to cook this syrup until it become reddish-brown (very important!) so that the sugar will dissolve completely, leaving just the unsweetened syrup. If you cook it too long, it will become bitter; not long enough, it’ll still be sweet. You can add a little bit of warm water to the mixture if your syrup is too thick.
  • Ok. Now that we have our syrup and our fish is still being cooked over medium-low heat, add the syrup to the fish pan and simmer over low heat. You don’t have to mess with it much after this point, just let it cook evenly on both sides while the sauce reduce.

The final product should taste sweet, slightly salty, and spicy; your fish should look like it’s been caramelized in the rich-thick sauce (reddish color). This cooking method may seem complicated at first, but after a few tries, it’ll be worth the effort. It took me 2 tries just to get it right. It’s also good to know that this might not be the best dish to make when you’re really hungry, since the total cooking time is around 1 and a half hour.

To serve: sprinkle some chopped green onions on top and you’re ready to eat.

Vietnamese Soul Food part I (canh chua)

I always found it interesting how the definition of “Soul Food” could have a different resonance to different people, depending on who they are, and where they grew up. For me, I tend to enjoy the combination of something soupy and savory, regardless of weather or time of day. Lucky for me, Vietnamese cuisines feature a wide variety of “soul” foods.

A couple of nights ago, I’ve decided to make Vietnamese “sweet and sour” soup (or canh chua in Vietnamese) to pair with caramelized catfish (ca kho to) to be served with rice. To me, this is the equivalent to fried chicken and mash potatoes; this is what I grew up eating, this is also considered as a very traditional Vietnamese meal. Like all great dishes, its origins typically came from necessity and what’s readily available to a given region. In most of Asia, fish and vegetables were considered cheap and in abundance, while meat and dairy products were expensive and often exported to the more “privileged” crowd. It’s funny how things are flipped here with seafood prices marked up so high.

I’ll show you how to make sweet and sour soup now, and save the caramelized fish for next time. To make the soup, here are some things that you’ll need:

  • Tamarind (you can get the paste or the powder; this is the sour component)
  • 2-3 fresh chili pepper (chopped finely)
  • 1 pineapple (chopped into cubes)
  • 3 small cups of okra
  • 2 handful of bean sprouts
  • Thai Basil
  • Rice paddy herbs
  • Fish sauce (to taste)
  • 2-3 roma tomatoes (chopped into even cubes)
  • Sugar (to taste)
  • 3 cloves of garlic
  • 1 onion
  • 2-3 catfish cut into even cubes (head is optional, but not really good eats in this case)
  • Freshly chopped celery (optional)

Directions:

  1. Finely chop garlic and onions and place them into a large pot with pre-heated oil. I’ve found that everything that’s good starts with garlic and onion (except for desert, that would be weird).
  2. Add the catfish and sear all sides until golden brown and remove from pot. Pre-cooking the fish this way will eliminate the fishy smell in the soup, and will allow the fish to hold better in the cooking process; skipping this step will be very bad.
  3. Add water to the pot. I usually filled the pot almost half way with water at this stage. You’ll find that the soup has a brownish color to it, this is what you want since you’re extracting the flavors from the garlic and onions at the bottom of the pot.
  4. Add the tomatoes and cook until they’re soft.
  5. Add the pineapple and okras and cook for about 5-7 mins.
  6. Add the fish, bean sprouts, chilly peppers, and celery.
  7. Season with sugar, fish sauce, and tamarind to taste. You want to add a little of each elements at first since fish sauce is really salty and tamarind is really sour. What you’re trying to achieve here is a balance between the sweet and sour, with a hint of saltiness. I like mine more on the sour side, but that’s just me.

To serve: Place the soup into a large bowl and add chopped basil, chili peppers, chopped rice paddy herbs on top.  This is great with plain rice and you can place a side of fish sauce with some chili pepper (I like it spicy) on the side to dip your veggies from the soup.

Cooking time should be no more than 30 mins so that all your ingredients are fresh and crunchy. A good note to add is that this is not really a good dish to re-heat more than 2x, since you’ll loose that initial freshness.